

Not all woodworking is about fine furniture. Sometimes it’s about important furniture—the pieces that hold family history. That’s the case with a set of chairs passed down from my great-grandparents. Structurally compromised but rich in heritage, these chairs deserved more than just a repair—they deserved thoughtful preservation.
After my brother and I carefully disassembled the loose chair joints and reassembled them with flexible epoxy, it was time to do something about the horrible rubber tips my parents put on the chairs to protect their floor. I realize my parents were proud of their kitchen renovation and wanted to keep the floor looking new as long as possible, but the rubber tips would fall off of at least one leg anytime a chair was moved, leaving it to wobble on three uneven legs. My parents deserved better than this! It was time to apply nice leather pads to the chairs that not only would protect the floor but wouldn’t damage the floor if and when they wore away.
This technique was taught to me by Jeff Lefkowitz during a Boggs side-chair class in 2017, and I’ve used it exclusively since. If you’re a chair enthusiast, you MUST check out his blog for a monstrous amount of chair-building goodness.
Why Not Use Store-Bought Pads?
Before we dive into the process, let’s address why those plastic or adhesive felt pads just don’t cut it:
- Plastic nail-in pads eventually wear down, exposing the nail and scraping the floor—defeating their purpose.
- Adhesive felt pads often peel off, leaving a sticky residue and coming loose with time and friction.
- Both options compromise both aesthetics and function.
- Leather pads, glued with hide glue, are the perfect alternative: subtle, durable, and easily replaceable.
Materials and Tools Needed
- Full-grain leather (scrap leather works great)
- Liquid hide glue (Old Brown Glue is a great option)
- Leather punch or ¾-in. round cutter
- Blue tape
Steps
1. Prepare the leather
Start by painting the back side of your leather sheet with liquid hide glue. Let it dry completely—this “primes” the leather, ensuring a strong bond later.
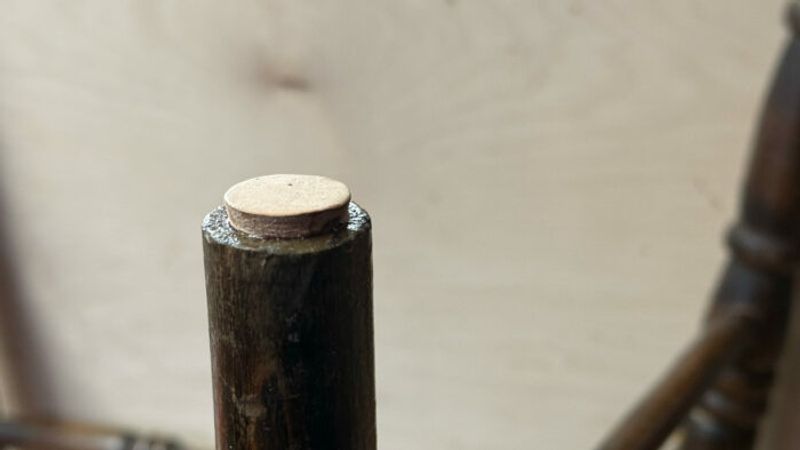
2. Punch the leather disks
Use a ¾-in. round leather punch to cut out disks from your primed leather sheet. These will be the pads that go on the bottom of each chair leg. Punch out extras. I keep a small box full of precut leather pads on hand, ready for use.
3. Prime the chair legs with hide glue
If it’s an old chair, lightly sand or rasp the contact surface before priming the wood—especially if it has a finish on it. Brush a coat of liquid hide glue onto the bottom of each chair leg; this primes the wood the same way we primed the leather. Let it dry fully before moving on.
4. Apply and reactivate the glue
Once both the leather and the wood are dry, apply another light coat of hide glue to both the leather pad and the chair leg. This reactivates the glue. Press the leather pad firmly onto the leg bottom and secure with tape. Leave it taped for several hours (or overnight, ideally).
Results and Longevity
The leather pads stay on for years, even under heavy use. We have chairs from 2017 that are still going strong with the original leather pads intact. Plus, they look great—subtle, understated, and far more in keeping with hand-built or antique furniture than mass-produced alternatives.
If you’re curious about how to fully disassemble and repair an old chair, let me know in the comments. I’ve restored dozens and would be happy to walk through that process in a future post.

Correct a Wobbly Chair
How to make a leather tabletop
A Woodworker’s Guide to Upholstery with Michael Mascelli
Sign up for eletters today and get the latest techniques and how-to from Fine Woodworking, plus special offers.


")


